Clock Repair Archive – – Tools:
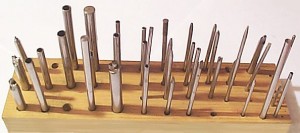
Be prepared to make your own tools or to modify commercially made items. Most of the tools that I have made have been made out of water hardening drill rod . punches: It is possible to buy commercially made punches in sets , but they will most likely not have all the combinations you need. It is not my intention to downplay commercially made tools ; and if you can afford them you will save a lot of time. Also , they can be altered if the need be. These are just some of the tools I have made and used:
countersink: There is a countersink that you will need ; actually you will probably need a set of them.
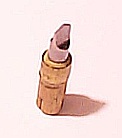
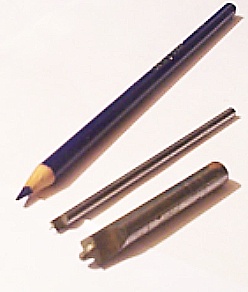
Many times it will be necessary to cut the protruding edge of a bushing flush with the plate surface to clear levers or gears that ride close to the plate. The countersink with the wooden holder is one that I use to actually put a “bevel” if you will, on the inside of bushings after they have been pressed into the plate and drilled to fit the size of the pivot. The reason for this is that after drilling or reaming, or what ever you do to get the pivot to fit in the bushing; there will be a slight edge on the inside of the hole. This , believe it or not , is enough to stop a clock ; particularly if the bushing is several gears up from the power. Putting the bevel inside the bushing keeps edges of the metal from interfering with the smooth motion of the gear. This is typical of the characteristics of slow moving low torque gear train action in clocks. The way things function in that type of environment are not the same as a fast moving gear train. This theory is covered later in this journal. I use this countersink by hand. Also , on the outside of the bushing (the part of the bushing facing away from between theand two brass plates of the mechanism that contain the gears) a bevel will add to the ability of the bushing to hold oil as it is not desirable to have oil run down the outside of the plates leaving the bushing effectively almost “dry”. You want a very slight bevel in the inside which is why you will probably want to use this tool by hand. The other “countersink” actually is for reducing the thickness of a bushing after it is installed , without disturbing the flat surface. Not all bushings fit the thickness of all plates , and sometimes it is absolutely necessary to reduce the thickness of a bushing because of its position relative to other moving parts. If the inside of the two cutting edges are shaped just right this countersink will do the “beveling” while you do the job of cutting the thickness of the bushing down. I have made mine out of drill rod. They can be hardened by dipping them in water after you have heated them with a propane torch until they are dull red hot. Be extremely careful when you are using any kind of heat or torch. I cannot stress this enough. You may need to practice some with the tempering process. If you get the metal too hot it will become brittle and will break easily. When properly tempered these tools will cut brass or bronze. I haven’t tried cutting steel on a regular basis. I use emery paper with a solid backing to sharpen them.
These are available from various tool manufacturers; but you will probably have to make your own to custom fit to the bushing sizes. Many times it will be necessary to cut the protruding edge of a bushing flush with the plate surface to clear levers or gears that ride close to the plate. The countersink with the wooden holder is one that I use to actually put a “bevel” if you will, on the inside of bushings after they have been pressed into the plate and drilled to fit the size of the pivot. The reason for this is that after drillinandg or reaming, or what ever you do to get the pivot to fit in the bushing; there will be a slight edge on the inside of the hole. This , believe it or not , is enough to stop a clock ; particularly if the bushing is several gears up from the power. Putting the bevel inside the bushing keeps edges of the metal from interfering with the smooth motion of the gear. This is typical of the characteristics of slow moving low torque gear train action in clocks. The way things function in that type of environment are not the same as a fast moving gear train. This theory is covered later in this journal. I use this countersink by hand. Also , on the outside of the bushing (the part of the bushing facing away from between the two brass plates of the mechanism that contain the gears) a bevel will add to the ability of the bushing to hold oil as it is not desirable to have oil run down the outside of the plates leaving the bushing effectively almost “dry”. You want a very slight bevel in the inside which is why you will probably want to use this tool by hand. The other “countersink” actually is for reducing the thickness of a bushing after it is installed , without disturbing the flat surface. Not all bushings fit the thickness of all plates , and sometimes it is absolutely necessary to reduce the thickness of a bushing because of its position relative to other moving parts. If the inside of the two cutting edges are shaped just right this countersink will do the “beveling” while you do the job of cutting the thickness of the bushing down. I have made mine out of drill rod. They can be hardened by dipping them in water after you have heated them with a propane torch until they are dull red hot. Be extremely careful when you are using any kind of heat or torch. I cannot stress this enough. You may need to practice some with the tempering process. If you get the metal too hot it will become brittle and will break easily. When properly tempered these tools will cut brass or bronze. I haven’t tried cutting steel on a regular basis. I use emery andpaper with a solid backing to sharpen them.
Aluminum and brass blocks:
A couple of blocks of aluminum and brass about 3\4 inch square and 2 inches long will be quite useful. A small wooden mallet is very useful for installing cams , and friction fit sleeves made of brass. Make sure the wood is something hard like oak small brass headed hammer is also useful for working with punches to avoid flattening the ends of them as a steel hammer will do. Escape wheel teeth can be straightened by forming a piece of brass or soft steel rod to the shape of the space between teeth (providing there are at least 3 good teeth on the wheel; then work your way around the wheel pressing the piece between the teeth that are bent and after 2 or 3 times around the teeth will be quite uniform in distance from each other. Each time a pattern is made by all means mark it and save it because you will undoubtedly need it again.


